In the previous guide, we introduced the installation of drivers and the basic environment setup required for Tenstorrent NPU . For detailed instructions, please refer to the Tenstorrent NPU Wormhole N300S Setup Guide.
This guide is divided into three parts to walk you through the installation process of Tenstorrent SDKs.
In this first part, we will cover TT-Buda in detail, focusing on the complete Tenstorrent TT-Buda Installation process.
Subsequent parts will provide step-by-step instructions on installing and using TT-Metalium and TT-Forge, along with practical examples.
In this guide, we will walk you through the installation of Tenstorrent TT-Buda, the high-level AI/ML SDK that compiles and runs models on Tenstorrent hardware.
Installing Tenstorrent TT-Buda: Complete Setup Guide
TT-Buda™ is Tenstorrent’s high-level AI/ML SDK that compiles and runs models on Tenstorrent hardware. It supports frameworks like PyTorch, TensorFlow, ONNX , ensuring compatibility before execution.
Inside TT-Buda, PyBuda™ provides a Python interface for direct model import and execution.
Next, we will guide you through the installation process of TT-Buda.
Step-by-Step Tenstorrent TT-Buda Installation Guide
1. Backend Compiler Dependencies
Instructions to install the Tenstorrent backend compiler dependencies on a fresh install of Ubuntu Server 20.04 or Ubuntu Server 22.04.
You may need to append each apt command with sudo if you do not have root permissions.
For both operating systems run the following commands:
apt update -y
apt upgrade -y --no-install-recommends
apt install -y build-essential curl libboost-all-dev \
    libgl1-mesa-glx libgoogle-glog-dev libhdf5-serial-dev \
    ruby software-properties-common libzmq3-dev clang wget \
    python3-pip python-is-python3 python3-venv

## required for Ubuntu 20.04)
apt install -y libyaml-cpp-dev

## required for Ubuntu 22.04)
wget http://mirrors.kernel.org/ubuntu/pool/main/y/yaml-cpp/libyaml-cpp-dev_0.6.2-4ubuntu1_amd64.deb
wget http://mirrors.kernel.org/ubuntu/pool/main/y/yaml-cpp/libyaml-cpp0.6_0.6.2-4ubuntu1_amd64.deb
dpkg -i libyaml-cpp-dev_0.6.2-4ubuntu1_amd64.deb libyaml-cpp0.6_0.6.2-4ubuntu1_amd64.deb
rm libyaml-cpp-dev_0.6.2-4ubuntu1_amd64.deb libyaml-cpp0.6_0.6.2-4ubuntu1_amd64.deb
2. Pybuda Installation for Tenstorrent TT-Buda
There are two ways to install PyBuda within the host environment: using Python virtual environment or Docker container.
2.1 Python Environment Installation
We highly recommend setting up a virtual environment for each project that uses PyBuda and its Python dependencies. This ensures a clean and isolated workspace, making dependency management easier.
Download the .zip package and unzip to find the pybuda, tvm and torchvison wheel files
## if Device : Grayskull and ubuntu 20.04
wget https://github.com/tenstorrent/tt-buda/releases/download/v0.19.3/pybuda-gs-v0.19.3-ubuntu-20-04-amd64-python3.8.zip

## if Device : Wormhole and ubuntu 20.04
wget https://github.com/tenstorrent/tt-buda/releases/download/v0.19.3/pybuda-wh.b0-v0.19.3-ubuntu-20-04-amd64-python3.8.zip

## if Device : Grayskull and ubuntu 22.04
wget https://github.com/tenstorrent/tt-buda/releases/download/v0.19.3/pybuda-gs-v0.19.3-ubuntu-22-04-amd64-python3.10.zip

## if Device : Wormhole and ubuntu 22.04
wget https://github.com/tenstorrent/tt-buda/releases/download/v0.19.3/pybuda-wh.b0-v0.19.3-ubuntu-22-04-amd64-python3.10.zip
2.1.1 Create your Python environment in desired directory
python3 -m venv pybuda_env
source pybuda_env/bin/activate
2.1.2 Pip install PyBuda, TVM and Torchvision whl files
pip install --upgrade pip==24.0
pip install torchvision-.whl pybuda-.whl tvm-.whl

## ex...
(pybuda_env) root@test:/opt/pybuda# pip install torchvision-0.16.0+fbb4cc5-cp310-cp310-linux_x86_64.whl pybuda-0.1.240917+dev.wh.b0.12bb84b-cp310-cp310-linux_x86_64.whl tvm-0.14.0+dev.tt.0840d6bef-cp310-cp310-linux_x86_64.whl

## Pip install Debuda (Optional Step)
pip install debuda-.whl
2.2 Docker Container Installation
Alternatively, PyBuda and its dependencies are provided as Docker images which can run in separate containers. The Docker containers can be found Here
2.2.1 Install Docker
To install Docker on Ubuntu, run the following commands:
## Install Package
apt-get install apt-transport-https ca-certificates curl software-properties-common

## Add Docker's Official GPG Key
curl -fsSL https://download.docker.com/linux/ubuntu/gpg | sudo gpg --dearmor -o /usr/share/keyrings/docker-archive-keyring.gpg

echo "deb [arch=amd64 signed-by=/usr/share/keyrings/docker-archive-keyring.gpg] https://download.docker.com/linux/ubuntu focal stable" | sudo tee /etc/apt/sources.list.d/docker.list > /dev/null

## Pakcage Update
sudo apt-get update

## Install Docker
sudo apt-get install docker-ce docker-ce-cli containerd.io

(pybuda_env) root@test:/opt/pybuda# systemctl status docker
● docker.service - Docker Application Container Engine
     Loaded: loaded (/lib/systemd/system/docker.service; enabled; vendor preset: enabled)
     Active: active (running) since Mon 2025-03-10 09:25:59 UTC; 4s ago
TriggeredBy: ● docker.socket
       Docs: https://docs.docker.com
   Main PID: 86857 (dockerd)
      Tasks: 26
     Memory: 25.4M
        CPU: 163ms
     CGroup: /system.slice/docker.service
             └─86857 /usr/bin/dockerd -H fd:// --containerd=/run/containerd/containerd.sock

Mar 10 09:25:58 test dockerd[86857]: time="2025-03-10T09:25:58.968668449Z" level=info msg="detected 127.0.0.53 nameserver, assuming systemd-resolved, so using r>
Mar 10 09:25:58 test dockerd[86857]: time="2025-03-10T09:25:58.981593240Z" level=info msg="[graphdriver] using prior storage driver: overlay2"
Mar 10 09:25:58 test dockerd[86857]: time="2025-03-10T09:25:58.981678411Z" level=info msg="Loading containers: start."
Mar 10 09:25:59 test dockerd[86857]: time="2025-03-10T09:25:59.832349184Z" level=info msg="Loading containers: done."
Mar 10 09:25:59 test dockerd[86857]: time="2025-03-10T09:25:59.837828523Z" level=info msg="Docker daemon" commit=bbd0a17 containerd-snapshotter=false storage-dr>
Mar 10 09:25:59 test dockerd[86857]: time="2025-03-10T09:25:59.837857180Z" level=info msg="Initializing buildkit"
Mar 10 09:25:59 test dockerd[86857]: time="2025-03-10T09:25:59.846673638Z" level=info msg="Completed buildkit initialization"
Mar 10 09:25:59 test dockerd[86857]: time="2025-03-10T09:25:59.849461768Z" level=info msg="Daemon has completed initialization"
Mar 10 09:25:59 test dockerd[86857]: time="2025-03-10T09:25:59.849510404Z" level=info msg="API listen on /run/docker.sock"
Mar 10 09:25:59 test systemd[1]: Started Docker Application Container Engine.
lines 1-22/22 (END)
2.2.2 Pull the docker image
Supported OS <OS-VERSION> Versions:
- ubuntu-20-04-amd64
- ubuntu-22-04-amd64
Supported Tenstorrent <TT-DEVICE> Devices:
- gs
- wh_b0
To pull the Docker image, use the following command:
sudo docker pull ghcr.io/tenstorrent/tt-buda//:

## ex..Wormhome and Ubuntu 22.04
docker pull ghcr.io/tenstorrent/tt-buda/ubuntu-22-04-amd64/wh_b0:v0.19.3

(pybuda_env) root@test:/opt/pybuda# docker pull ghcr.io/tenstorrent/tt-buda/ubuntu-22-04-amd64/wh_b0:v0.19.3
v0.19.3: Pulling from tenstorrent/tt-buda/ubuntu-22-04-amd64/wh_b0
7478e0ac0f23: Pull complete
ba5453cbe7ab: Downloading [====>                                              ]  45.42MB/517MB
14c4dab85cef: Download complete
e9ccafca6782: Download complete
ea977713f22c: Download complete
d45ae925c375: Download complete
4f4fb700ef54: Download complete
e89a95df6b10: Download complete
878b81dca23a: Downloading [===================>                               ]  40.55MB/103.8MB
8aa7d0f20b95: Download complete
14fc56a77fed: Downloading [==============>                                    ]  21.09MB/73.37MB
59cce07a16af: Pulling fs layer
2.2.3 Run the container
sudo docker run --rm -ti --cap-add=sys_nice --shm-size=4g --device /dev/tenstorrent -v /dev/hugepages-1G:/dev/hugepages-1G -v $(pwd)/:/home/ ghcr.io/tenstorrent/tt-buda//: bash

## ex..
sudo docker run --rm -ti --cap-add=sys_nice --shm-size=4g --device /dev/tenstorrent -v /dev/hugepages-1G:/dev/hugepages-1G -v $(pwd)/:/home/ ghcr.io/tenstorrent/tt-buda/ubuntu-22-04-amd64/wh_b0:v0.19.3 bash
2.3 Tests
Verify the correct installation of the PyBuda library and environment by conducting
import pybuda
import torch
# Sample PyTorch module
class PyTorchTestModule(torch.nn.Module):
def __init__(self):
super().__init__()
self.weights1 = torch.nn.Parameter(torch.rand(32, 32), requires_grad=True)
self.weights2 = torch.nn.Parameter(torch.rand(32, 32), requires_grad=True)
def forward(self, act1, act2):
m1 = torch.matmul(act1, self.weights1)
m2 = torch.matmul(act2, self.weights2)
return m1 + m2, m1
def test_module_direct_pytorch():
input1 = torch.rand(4, 32, 32)
input2 = torch.rand(4, 32, 32)
# Run single inference pass on a PyTorch module, using a wrapper to convert to PyBuda first
output = pybuda.PyTorchModule("direct_pt", PyTorchTestModule()).run(input1, input2)
print(output)
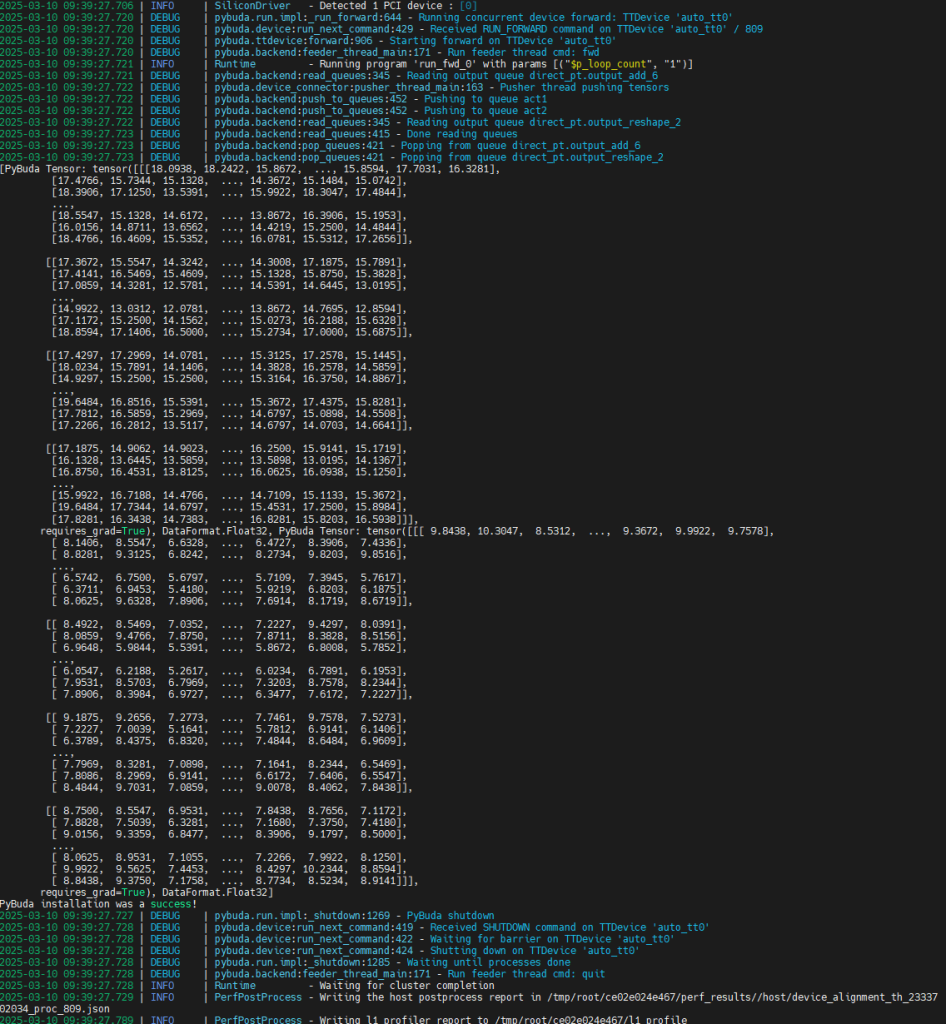
print("PyBuda installation was a success!")
if __name__ == "__main__":
test_module_direct_pytorch()
Output
Running a Quick Start Demo with TT-Buda
After successfully setting up the PyBuda environment, we can now proceed with running an AI model on Tenstorrent hardware.
In this section, we will demonstrate how to execute a sample deep learning model using TT-Buda.
1. Clone the TT-Buda Demos Repository
First, download the TT-Buda demo repository, which contains various model implementations.
git clone https://github.com/tenstorrent/tt-buda-demos.git
cd tt-buda-demos
2. Install Required Dependencies
Once the dependencies are installed, you can run a sample model demo. Here, we demonstrate running a ResNet model with TT-Buda:
pip install -r model_demos/requirements.txt
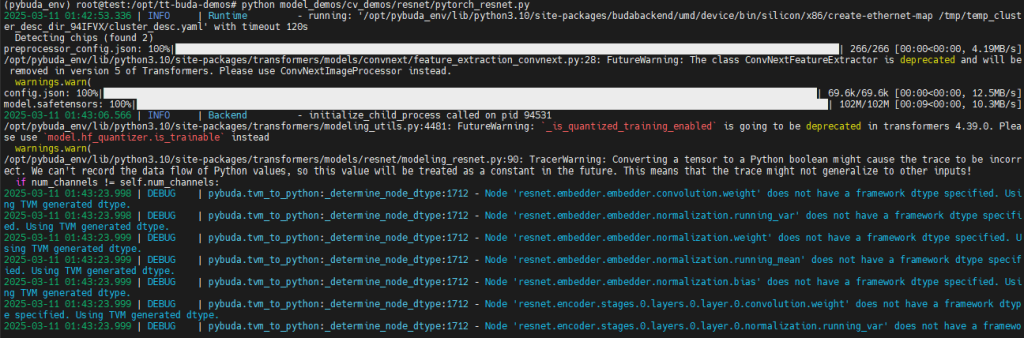
3. Running a Quick Start Model (ResNet)
Before running the demo, install the necessary dependencies by executing:
export PYTHONPATH=.
python model_demos/cv_demos/resnet/pytorch_resnet.py
However, when attempting to run the ResNet demo, the following error occurred:
(pybuda_env) root@test:/opt/tt-buda-demos# python model_demos/cv_demos/resnet/pytorch_resnet.py
2025-03-11 01:40:57.575 | INFO     | Runtime         - running: '/opt/pybuda_env/lib/python3.10/site-packages/budabackend/umd/device/bin/silicon/x86/create-ethernet-map /tmp/temp_cluster_desc_dir_itlOtw/cluster_desc.yaml' with timeout 120s
  Detecting chips (found 2)
/opt/pybuda_env/lib/python3.10/site-packages/mxnet/numpy/utils.py:37: FutureWarning: In the future `np.bool` will be defined as the corresponding NumPy scalar.
  bool = onp.bool
Traceback (most recent call last):
  File "/opt/tt-buda-demos/model_demos/cv_demos/resnet/pytorch_resnet.py", line 8, in
    import pybuda
  File "/opt/pybuda_env/lib/python3.10/site-packages/pybuda/__init__.py", line 42, in
    from .module import Module, PyTorchModule, PyBudaModule, TFModule, TFGraphDefModule, OnnxModule, MXNetModule, JaxModule, TFLiteModule
  File "/opt/pybuda_env/lib/python3.10/site-packages/pybuda/module.py", line 15, in
    from .tensor import SomeTensor, Tensor, to_pt_tensors, to_tf_tensors, to_tf_variables, pytorch_dtype_to_buda_dataformat, buda_dataformat_to_pytorch_dtype
  File "/opt/pybuda_env/lib/python3.10/site-packages/pybuda/tensor.py", line 10, in
    import mxnet
  File "/opt/pybuda_env/lib/python3.10/site-packages/mxnet/__init__.py", line 33, in
    from . import contrib
  File "/opt/pybuda_env/lib/python3.10/site-packages/mxnet/contrib/__init__.py", line 30, in
    from . import text
  File "/opt/pybuda_env/lib/python3.10/site-packages/mxnet/contrib/text/__init__.py", line 23, in
    from . import embedding
  File "/opt/pybuda_env/lib/python3.10/site-packages/mxnet/contrib/text/embedding.py", line 36, in
    from ... import numpy as _mx_np
  File "/opt/pybuda_env/lib/python3.10/site-packages/mxnet/numpy/__init__.py", line 23, in
    from .multiarray import *  # pylint: disable=wildcard-import
  File "/opt/pybuda_env/lib/python3.10/site-packages/mxnet/numpy/multiarray.py", line 47, in
    from .utils import _get_np_op
  File "/opt/pybuda_env/lib/python3.10/site-packages/mxnet/numpy/utils.py", line 37, in
    bool = onp.bool
  File "/opt/pybuda_env/lib/python3.10/site-packages/numpy/__init__.py", line 305, in __getattr__
    raise AttributeError(__former_attrs__[attr])
AttributeError: module 'numpy' has no attribute 'bool'.
`np.bool` was a deprecated alias for the builtin `bool`. To avoid this error in existing code, use `bool` by itself. Doing this will not modify any behavior and is safe. If you specifically wanted the numpy scalar type, use `np.bool_` here.
The aliases was originally deprecated in NumPy 1.20; for more details and guidance see the original release note at:
    https://numpy.org/devdocs/release/1.20.0-notes.html#deprecations. Did you mean: 'bool_'?
Encountered Error: module 'numpy' has no attribute 'bool'
After executing the ResNet demo, the script failed due to a deprecated attribute in NumPy. This issue is specifically related to the bool alias, which was removed in NumPy 1.20.
The root cause of the issue is found in the MXNet library, where the deprecated np.bool alias is still being used.
How to Fix the Error
To resolve this, the utils.py file inside MXNet needs to be modified.
1. Open the affected file:
vim /opt/pybuda_env/lib/python3.10/site-packages/mxnet/numpy/utils.py
2. Navigate to line 37, where you will find:
bool = onp.bool

## Modify it as follows:
bool = bool

## Save :wq
3. Run the demo again:
python model_demos/cv_demos/resnet/pytorch_resnet.py
Output
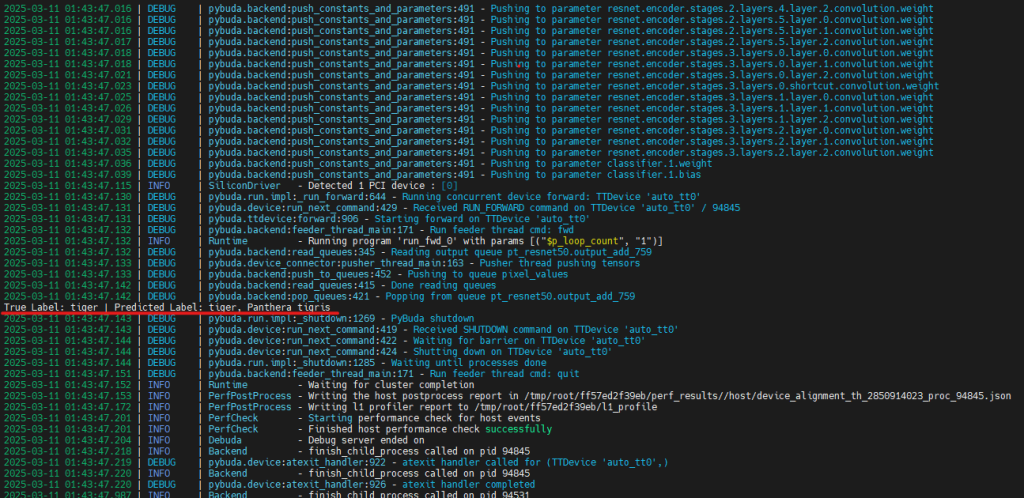
TT-Buda supports multiple AI/ML models. You can check the complete list of supported models by visiting the TT-Buda Demos Repository.
Thank you